Before my summer internship becomes an irrelevant topic on this blog, I wanted to share the design I created for my program. The purpose was to create a design that speaks out about a certain societal issue or charitable cause. There was a competition for best design, and though I did not win, I really really enjoyed this project and what it did for myself personally.
The topic I chose was something really close to me, depression.
Don’t Let Go: In a day and age where so much is at our fingertips, there are still millions of people suffering from depression. And thousands of people who commit suicide every year. Whether it is because of bullying, societal pressures, failure or love, it is all such an agonizing feeling. People are put down by societal pressure, familial pressure, and above all, internal pressure. We have come so far, and yet we are so fragile. I am trying to speak to these people and tell them, Don’t let go. Don’t let go of your life. Don’t let go of your love. Don’t let go of everything you’ve worked for. Don’t let go of your dreams. Don’t let go.
This was such great therapy for myself. I've come such a long way, struggled so much, and I don't want to waste all that I've done for myself. This surprised me because it helped me think about so many things.
I pulled images I found online and did this all on Photoshop over the span of a few days. It was actually my first time using Photoshop too. It was such a learning experience both personally and technically. Despite my whole description, what does this design say to you? I would really love to know.
Thursday, August 30, 2012
Monday, August 27, 2012
Instant Happiness
I went to HMart (a Korean supermarket) this past weekend for the first time in forever. HMart is always so generous in giving free samples for customers to try. I went out on a mission to try all their offerings on the floor. I sampled udon noodles, dumplings, more dumplings, some salad, and a bunch of other things. As long as it was food and free, I shoved it all into my mouth. I was in heaven. Delicious, Korean heaven.
And then I found this.
And I sampled it.
And I threw it into my shopping cart.
It? What is it? It is this. This. This is instant tteokbokki. *cue dramatic the heavens have cleared music*


And then I found this.
And I sampled it.
And I threw it into my shopping cart.
It? What is it? It is this. This. This is instant tteokbokki. *cue dramatic the heavens have cleared music*
From my experience, actual tteokbokki usually consists of rice cakes, fish cakes, and sometimes cheese and noodles, all covered in a sweet and spicy sauce. It is a magnificent concoction, and I cannot make it. I've tried...and failed so so miserably. So when I saw this, I was immediately drawn to its microwavable (!!!!) capability. Whoever thought up this idea is a damn genius.
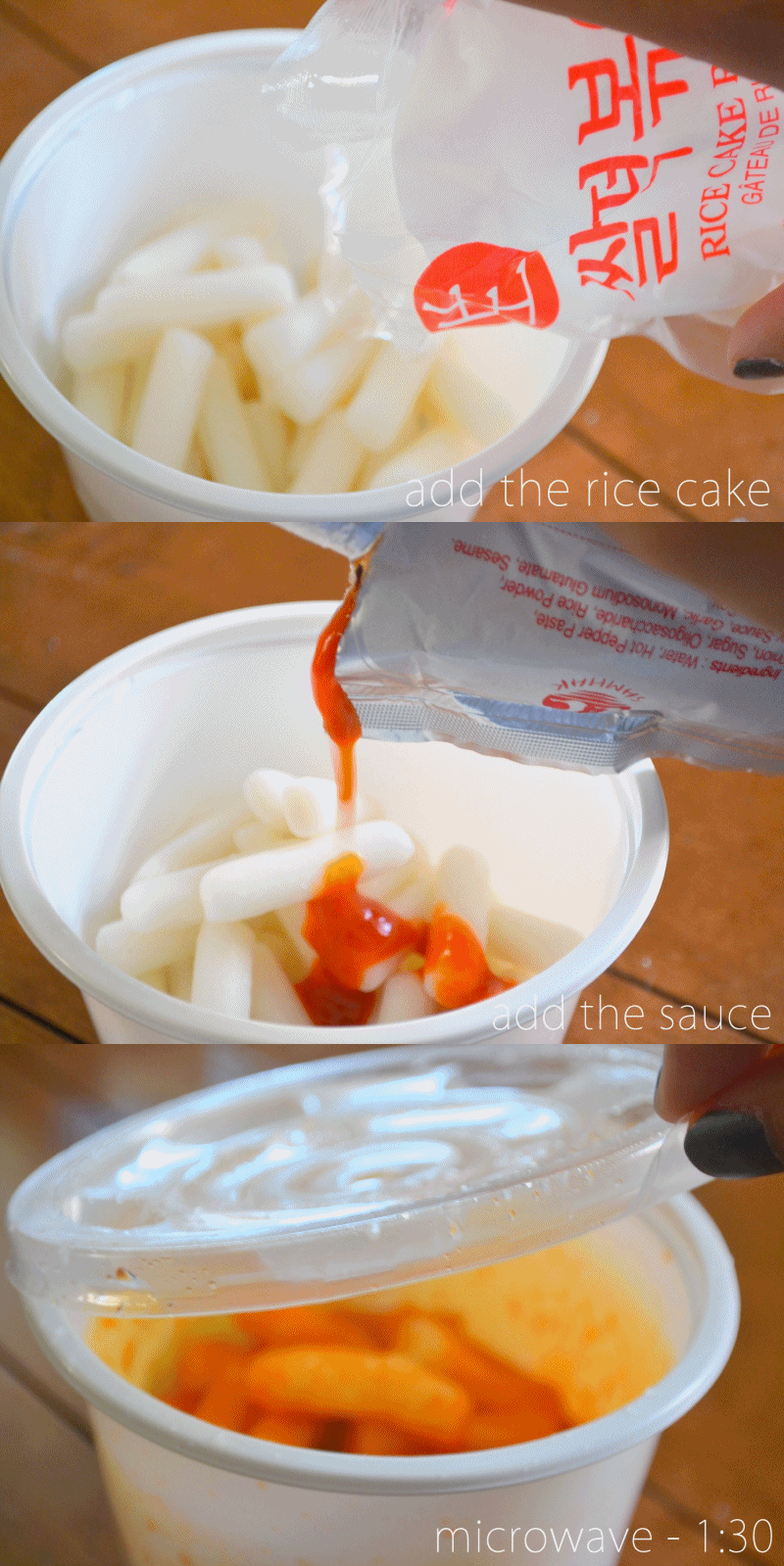
The little pack comes with a bowl, rice cakes, sauce, and a cute little fork. The bowl has a lid with a whole in the middle for steam to circulate. Following the instructions on the sleeve, I prepared to devour this spicy, chewy goodness.
First, you dump the rice cakes into the bowl. Then, you add the sauce. I only used half of the sauce packet and that was more than enough. Lastly, you put the lid back on and pop it in the microwave for 90 seconds. You take it out, mix it all up, and dig in!
I can only imagine how healthy this is for you, but all in moderation, right? I shared this with my mom. It's nice to satisfy those occasional, sudden cravings once in a while! ;)
Also, I made a new banner! How does it look? I'd been wanting to make a new one for a while, but never got to it until yesterday. Still not very satisfied with it, but it will do for now until I make one with actual polka dots! Have a great week ahead!
Saturday, August 25, 2012
An Outfit at Sundown
Okay, first. Stop what you're doing. And click play on this video..
The sun was about to set, so I thought it would be nice to take some pictures of my outfit. The pictures would have this nice romantic glow to them because of the setting sun. And for once, I was wearing an outfit that looked decent...although I kind of just slapped it all together. It seems the best outfits are always an accident for me?
Think about the world. Think about your life. Think about your friends. Your family. Think about all the sweet memories you've made. And all the sweet memories you're going to make. Go out, stare at the sky for a few minutes. Listen to the bustling city. Listen to the trees swaying in the wind. Listen to each breath you take. Take in all the sights and sounds of your life, your neighborhood, your town, your city...and cherish it. It's quite beautiful, isn't it?
Now proceed and have that playing in the background while you read this post. :)
The sun was about to set, so I thought it would be nice to take some pictures of my outfit. The pictures would have this nice romantic glow to them because of the setting sun. And for once, I was wearing an outfit that looked decent...although I kind of just slapped it all together. It seems the best outfits are always an accident for me?
Shadows of the jungle gym -- I took these pictures in a playground.
Sorry about the naked face.
You can see my TOMS tan line!
I tried to pose, but ended up just looking quite awkward. // The clouds are perfectly wispy.
Cardigan - American Eagle, T-shirt - H&M, Floral skirt - Forever 21, Flats - Old Navy, Satchel - H&M.
I hope you're having a great weekend! Yesterday was the last day of my internship and it was quite sad. I'm not very good with goodbyes and I just didn't know what to say when I parted with my co-workers. I really can't believe this summer is already over. It’s a peculiar thing getting to know other people for this short period of time, starting to like them, and then having to leave at a designated time. You knew that last day would come eventually, but you really didn’t want it to come. There’s this fixation that you don’t really want to let go of just yet.
It was only 7 weeks and yet I grew attached to this place and the people in it. Handshakes and hugs and thank you e-mails…it’s all over now. And I’m just thinking, was it all a dream?
Wednesday, August 22, 2012
Magnetic Magic
What is this!? A rare nail polish post from Maggie?
Blasphemy!
Enter: 17 Magnetized Nail Polish in Grey. I received this from Jian a while back, but me not being a nail polish person, never got to trying it until today. I mean, the only thing I ever do to my nails is cut them. (Alas, I am too lazy.) I guess I was feeling a little curious today. Sorry about the sloppy application by the way, I literally have not painted my nails in years.
This specific brand is from the UK (I'm assuming), but these magnetic nail polishes have been popping up in drugstores over here already (I know Sally Hansen has some). The cap comes off and there is a magnet on top. There's also this very helpful little thing-a-ma-bobber jutting out of the cap for you to lay on your finger, which keeps the correct distance between the magnet and your nails. I was pretty doubtful about whether this measly-looking magnet would work...but boy, was I proven wrong.
The nails seem to be reaching for their lovely faucet counterpart.
The color of the nail polish itself is a nice steel gray with a fabulous metallic finish. It applied very smoothly and was opaque in 2 coats. I do quite like it on its own. It's a nice dark color, which is probably not the most fitting to wear while it's still summer but I digress.

Left: 2 coats un-magnetized, Right: 2 coats magnetized.
When magnetized, that distinct tiger bead-like pattern appears...like magic! I was so amazed at every single nail when I lifted up the magnetic cap. It turned into more of a black with gray currents rather than the original gray with black currents.
Two things though: 1) you have to do one nail at a time, or else the nail polish will dry up before you get to magnetizing it, and 2) "hover" the magnet stationarily. I figured these out too late, hence my entire left hand.
Yeah, that wasn't on purpose.
But yes, I will be wearing my nails like that. Have you tried magnetized nail polish yet?
Sunday, August 19, 2012
3 Looks, 1 Infallible
Remember how I raved about some L'Oreal Infallibles a couple months ago? Here I am today to show you just how much I love the one in Smoldering Plum. It is so unbelievably versatile. I created 3 looks using solely the eyeshadow (and of course, a few different lip products).
Feast your eyes on this chameleon of an eyeshadow!
1. bold purple winged liner, 2. an actually "smoldering plum" smokey eye, 3. everyday brown.
Sorry about the weird scowl in the middle picture. I was trying to look fierce and angry or something...yeah, that happened. I wanted each look to have a different feel: the first would be bold and edgy, the second would be sexy and more undone, and the third would be light and refreshing. I even put on different shirts for each look! In all three looks, though, the focus was on the eyes.
Here are the products I used:
- L'Oreal Infallible Eyeshadow in Smoldering Plum
- Revlon Super Lustrous Lipgloss in Nude Lustre (look 1)
- Revlon Color Burst Lipstick in Soft Nude (look 2)
- Maybelline Moisture Extreme Lipstick in Born With It (look 3)
- Maybelline XXL Pro Volume Waterproof Mascara in Very Black (look 1+3)
- A variety of brushes (ecoTools, Essence of Beauty, The Body Shop)
Look 1: Bold Purple Winged Eyeliner
Here I used Smoldering Plum as eyeliner. I used a thick eyeliner brush to build up the intensity of the eyeshadow, and then a thin eyeliner brush to get a more precise wing. I also used the thicker brush to drag some of the color down to the bottom lashline. The focus was the eyes, but I wanted the lips to still have a little bit of color with Revlon's Nude Lustre.
Look 2: "Smoldering Plum" Smokey Eye
In this look, I used the Smoldering Plum as a dark, pigmented eyeshadow. I packed on the color with a flat shader brush and blended out the edges with a fluffy rounded brush, creating a nice gradient effect. It was a rather (intensely) "undone" eyeshadow look so I skipped out on mascara.
Look 3: Everyday Brown Eyeshadow
I went for a more toned-down, everyday look for this last one. I used Smoldering Plum as both eyeshadow and eyeliner. I dabbed just the tiniest smidge of color with my fluffy blending brush and buffed it out all over my lid, which created the prettiest purpley brown. I used the thin eyeliner brush again to apply the eyeshadow as eyeliner onto my bottom lashline. Then I applied mascara to the top lashes only and a bright lip color, et voila!
This was one heck of a workout! Changing shirts and doing my hair and doing all these looks -- but it was so much fun! Do you see how awesome this eyeshadow is? I shall stroke it lovingly! Anyway, I CHALLENGE YOU to do 3 looks with ONE EYESHADOW (only)! Well, if you want to, I mean, I'm not forcing you...but it's totally worth it!
In other news, I am finally braces-free!!! I got my bottom braces off yesterday. 5 years and 3 months, and I'm finally FREEEEEE (with straight teeth)! So I'm sorry for the yellow teeth, I will be working on that in the coming weeks and months, hehe. It feels so weird having an entirely normal, metal-free mouth now.
I hope you all had a great weekend because well, you know I did.
Subscribe to:
Posts (Atom)